

Ready to stop spending money on bait and start raising your own? Building a worm farm for fishing is easier than you think, and it guarantees fresh, lively worms for every trip to the lake.
Plus, you’ll save money, reduce waste, and even get free garden compost as a bonus. Let’s jump into the 6 easy steps to building a worm farm for bait fishing that’ll keep your tackle box stocked year-round

Why Start a Worm Farm for Fishing?
Did you know a container of bait worms can cost up to $5 at the bait shop, and they don’t always stay fresh? By building your own worm farm, you’ll have an endless supply of live, wriggly worms ready for action.


Plus, home-raised worms stay healthier and last longer on the hook—perfect for those long fishing days!
Now that we’re on the same page, let’s get down to business.
Step 1: Choose the Perfect Location (Where Worms Feel Like VIPs)
Worms, like the rest of us, prefer the good life. That means avoiding places where the sun turns their humble abode into a sauna or where rain turns it into an Olympic swimming pool.
Find a spot that’s shaded, protected from wind and rain, and not too hot. Remember: worms are sensitive creatures—they want to thrive, not just survive.
Here’s where your worms will thrive:
- Shade: Keep them out of direct sunlight to prevent overheating.
- Cool Temps: Aim for 55°F–77°F for optimal comfort.
- Dry Spot: Protect the bin from rain to avoid flooding their home.
Step 2: Build Your Worm Bin (A Cozy Worm Mansion)
You don’t need a fancy mansion for your worms; any old plastic tote with a lid will do. If you’ve got a couple of spare containers lying around, you’re already halfway there!
One container will serve as the worm bin, and the other can catch drainage (aka worm tea—trust me, your plants will love it).
I like both DIY worm bin and store-bought. I have 3 worm towers, I bought bins, and 3 DIY bins.

What You’ll Need:
- A large plastic tote with a lid (20–30 gallons works great)
- Drill with a 1/8-inch bit
- Mesh or cardboard for the bottom layer
- Optional: A second tote to catch worm tea
- Pro Tip: Drill some holes in the sides and bottom of the bin for airflow and drainage. Worms love fresh air but hate a soggy mess. If you’re worried about worms escaping, add a layer of mesh or cardboard at the bottom. After all, we’re building a home, not a jail.
Step 3: Add Bedding and Soil (Think of It Like Worm Furniture)
Now it’s time to set up the interior design of your worm mansion. I recommend using peat moss, coconut coir, or a cheap seed-starter mix for bedding.
Pro tip: these materials are dry, so add water to moisten things up before introducing your worms. Nobody likes moving into a dry house.

For an extra cozy touch, throw in some shredded newspaper or non-waxy cardboard. Worms love to snuggle in there (trust me, they’ve told me).
Then, lay a sheet of moist cardboard on top to keep everything dark and damp—just the way they like it!
Step 4: Introduce Your Worms (Welcome to Your New Home!)
Now for the fun part—adding the worms! I personally prefer European nightcrawlers or red wigglers—they’re tough, prolific, and make excellent fishing bait.
You can grab them from your local bait shop or order them online from Meme’s Worms (where you can often snag some sweet deals).
Start with around 1 pound of worms (approximately 1,000 womrs) to get things moving.

After a long trip through the mail, your worms will be thirsty (who wouldn’t be?), so give them a little water to hydrate. Then, just pour them on top of the soil and leave the lid off for about an hour. They’ll squirm their way down into their new home, and before you know it, they’ll be living their best worm lives.
Step 5: Feeding Your Worms (They’re Not Picky Eaters, I Promise)
You don’t need to cook a five-course meal, but you do need to feed your worms to keep them happy and multiplying. Here’s the lowdown on worm cuisine:
Worm Feeding Dos and Don’ts:
- ✅ Fruits, veggies, coffee grounds, eggshells, shredded paper
- ❌ Meat, dairy, oils, citrus peels, greasy food

Read our post on feeding a worm bin here!
- Balanced Diet: Think of your worms as little compost machines. Feed them fruits, veggie scraps, coffee grounds, crushed eggshells, and shredded newspaper. Avoid meat, dairy, and anything greasy—that’ll just stink up the place.
- Chop & Bury: Chop food into small pieces and bury it in the bedding. This speeds up decomposition and helps prevent pests (nobody invited them to the worm party).
- Moderation is Key: Overfeeding can lead to a stinky, rotting mess, and trust me, your worms won’t appreciate it. Start small, then increase as they chow down on what you’re giving them.
Feed your worms once or twice a week in small portions, and remember—chop or blend the food small and bury it to prevent pests.
Step 6: Harvesting Worms for Fishing (Get Those Bait Worms Ready)
Once your worm population is booming, it’s time to harvest your bait. Gently remove the top layers of bedding to find your prize-winning worms.
If you’re not fishing right away, store the harvested worms in a cool, moist container—your fridge will do the trick. Just don’t confuse the worm bin with your snack drawer (lesson learned!).

Harvesting Made Easy:
- Use a worm sifter for quick separation.
- Do what I do and simply grab a handful of worms from the bin. What I don’t use for fishing, I return to the bin.
7 Tips for Maintaining a Healthy Worm Farm
Keeping your worm farm healthy ensures happy worms and endless bait. Here’s how:
The Best Worms for Fishing Bait: European vs. Canadian Nightcrawlers
Let’s talk about the real stars of the show—your future bait worms. When it comes to fishing, not all worms are created equal, and you want the best wriggly companions to catch those fish.
The top contenders for the job? European nightcrawlers and Canadian nightcrawlers. Let’s break down the pros and cons of each so you can choose your bait wisely!
Read our post on best worms to grow for fishing here!
Quick Comparison Table:
| Worm Type | Size | Breeding Speed | Best For |
|---|---|---|---|
| European Nightcrawlers | Medium | Fast | Composting & Fishing |
| Canadian Nightcrawlers | Large | Slow | Big Game Fishing |
Fun Fact: European nightcrawlers can live up to 4 years with proper care!
European Nightcrawlers (Eisenia hortensis)
If worms had resumes, the European nightcrawler would definitely list “multi-talented” at the top. These worms are a favorite among both composters and fishermen, which makes them the Swiss Army knife of worms.

Canadian Nightcrawlers (Lumbricus terrestris)
The Canadian nightcrawler is like the Arnold Schwarzenegger of worms. These big guys are robust, muscular (for worms, anyway), and perfect for catching larger fish. If you’re after the big catch, this is the worm for you.
For the Non-DIYers: Here Is A Worm Bin List!
Let’s be honest, not everyone wants to get their hands dirty building a worm bin from scratch—and that’s totally okay!
Maybe you’d rather spend your time fishing instead of wrestling with power tools and drill bits (I get it!). If you’d rather skip the DIY part and just buy a worm bin and worms, I’ve got you covered.
There are plenty of great options out there that will get you farming worms faster than you can say, “Fish on!”

Best Ready-Made Worm Bins for Fishing Bait
I use both DIY worm bins and store-bought bins. I love my Vermihut plus so much that I bought a second one. These are some bins I would buy.

VEVOR 5-Tray Worm Composter
A sturdy, budget-friendly multi-tray worm farm designed for indoor or outdoor vermicomposting.
Check Price →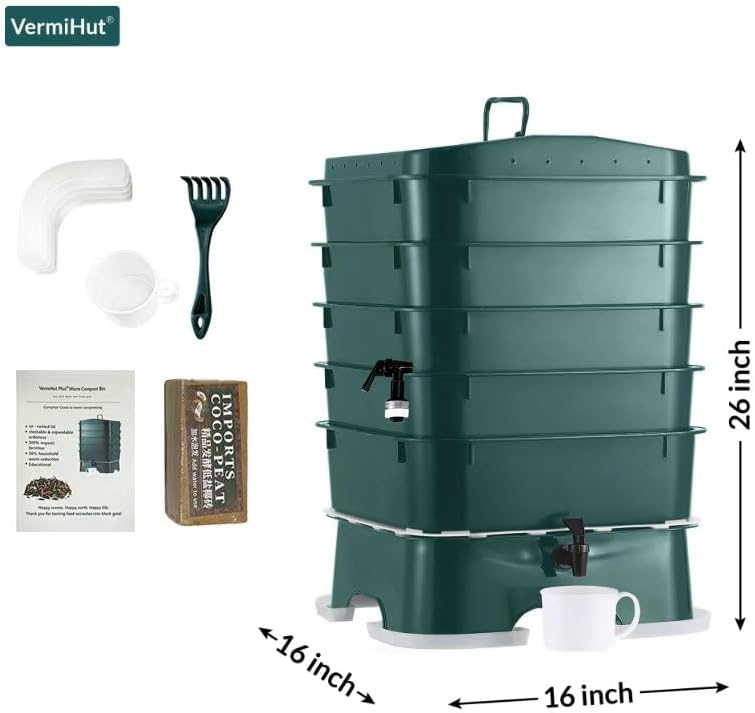
The Original Vermihut® Plus (5-Tray)
A popular worm composter with improved airflow, stacking trays, and beginner-friendly design.
Check Price →
Worm Factory® 360
A premium, well-known worm farm system built for long-term composting and easy harvesting.
Check Price →Disclosure: Some links may be affiliate links. If you purchase through them, I may earn a small commission at no extra cost to you.
Where to Get the Best Fishing Worms (No Digging Required)
So you’ve got your worm bin, but what about the star of the show—your worms?
Lucky for you, there is a place to buy high-quality fishing worms without ever leaving your couch. Here is my trusted source:

Conclusion: Start Your Worm Farm Today!
Ready to stop buying bait and start farming your own worms? Whether you’re a DIY enthusiast or prefer a ready-made setup, starting your worm farm is a game-changer for fishing trips.
Grab your bin, order some worms, and let the bait-growing fun begin!


Pingback: How to Raise Red Worms - Worm Farm Blog